
A very long time since I posted, in fact this is the first post of 2013! Mainly because my available hobby time has been spent on gaming, modelling and painting, so no great guilt on my part.
I confess I drifted from Naps for a while as I got distracted with working on my long-neglected Wars of the Roses collection (all the media coverage of Richard III's discovery rekindled a lifelong interest in the period), but we've had a number of Napoleonic games over the last few months, along with a return to WW2 that saw my Soviets actually victorious for once. So no lack of wargaming activity in one way or another.
Yesterday was our second Napoleonic game of the year, and frankly the less said about it the better. "Debacle" doesn't begin to describe it- the most lopsided Allied victory it's been my misfortune to take part in! Due to shitty design on my part, the scenario allowed for all the tactical finesse one would expect to find in a pair of paralytically stoned winos duking it out in some meth-induced brawl outside a seedy skid-row bar.
Gutted. I won't dwell on it any longer lest my still falling tears short-circuit my computer keyboard.
I will be posting some pictures of past games once I organize the photo albums, but in the meantime here is something different- the building of Le Monastère de Zinderneuf, or "tarting up" an Airfix French Foreign Legion fort!
 This one has had a long history. I seem to remember having bought the model at some decrepit hobby shop up in Ishinomaki years ago, largely out of nostalgia. Since then it had been to Canada and back (don't ask!) and for ages had just been gathering dust with no real use to man nor beast.
About a year ago I finally took it out of the box and put it together, but as I don't do any colonial gaming I didn't really know what I would do with it. Until around last Christmas, when I suddenly realized that with imagination and a fair bit of work, it may well do as a centerpiece for our Napoleonic games.
I thought it might be worthwhile to create something generic enough to serve over a variety of theatres and eras, from Spain to Germany and from medieval times to WW2.
With no real prototype in mind, I looked at the model and thought that:
I confess I drifted from Naps for a while as I got distracted with working on my long-neglected Wars of the Roses collection (all the media coverage of Richard III's discovery rekindled a lifelong interest in the period), but we've had a number of Napoleonic games over the last few months, along with a return to WW2 that saw my Soviets actually victorious for once. So no lack of wargaming activity in one way or another.
Yesterday was our second Napoleonic game of the year, and frankly the less said about it the better. "Debacle" doesn't begin to describe it- the most lopsided Allied victory it's been my misfortune to take part in! Due to shitty design on my part, the scenario allowed for all the tactical finesse one would expect to find in a pair of paralytically stoned winos duking it out in some meth-induced brawl outside a seedy skid-row bar.
Gutted. I won't dwell on it any longer lest my still falling tears short-circuit my computer keyboard.
I will be posting some pictures of past games once I organize the photo albums, but in the meantime here is something different- the building of Le Monastère de Zinderneuf, or "tarting up" an Airfix French Foreign Legion fort!

About a year ago I finally took it out of the box and put it together, but as I don't do any colonial gaming I didn't really know what I would do with it. Until around last Christmas, when I suddenly realized that with imagination and a fair bit of work, it may well do as a centerpiece for our Napoleonic games.
I thought it might be worthwhile to create something generic enough to serve over a variety of theatres and eras, from Spain to Germany and from medieval times to WW2.
With no real prototype in mind, I looked at the model and thought that:
- Those poorly-moulded beams projecting from the walls had to go. They really gave it that French-Foreign-Legion-in-Morocco look that I definitely did not want.
- Unsightly holes, windows and other openings would be blanked off with plastic card from the interior.
- Like all Airfix buildings, the walls are way too thin. I decided to build them out with wood and plastic card where I could, and to use thick card and filler to make the crenelations a little more substantial.
- The surfaces needed to be heavily textured, and I would add a lot of simulated stonework.
- The whole thing would be placed on a foam board base to make it a little more imposing.
- Finally, I would provide a detachable roof for the tower top, just 'coz it looked nice.
After solidly gluing the joins and filling in the more glaring gaps with putty and slivers of card, I firmly attached the fort to its new base using epoxy.
Then out came the cardboard stock and general-purpose glue, and I set to the rather scary task of cutting out stonework.
Lots of it.
Somewhat laborious, but made easier while listening to podcasts and watching documentaries on YouTube about castles! I soon got into a comfortable rhythm with the project.

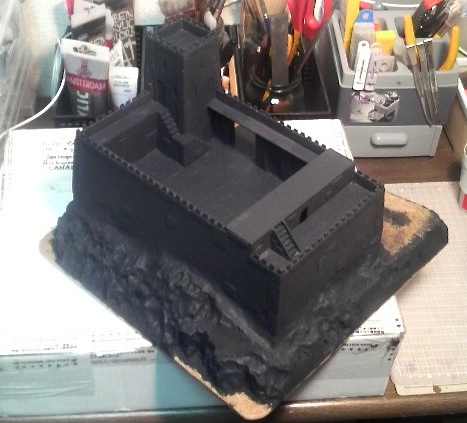
This picture shows it after the walls had been made thicker with plastic card and wooden beams, the whole model having been mounted on a base made of two layers of insulation board.
The pathway leading up to the gate was then carved into shape, and you can see where I glued on the card "stonework". Lots of fun, and boy, did those glue fumes ever stink. Got loads of grief over that...
The pathway leading up to the gate was then carved into shape, and you can see where I glued on the card "stonework". Lots of fun, and boy, did those glue fumes ever stink. Got loads of grief over that...

In a mad moment of masochism I had decided to cut out flagstones for the courtyard before filling in the area between the beams with papier-mâché. Worked a treat.
Many moons later, the whole structure was coated liberally with a creamy coat of acrylic filler mixed with PVA and some fine sand. This textured the whole thing nicely, and it lost its "plastic toy fort" look.
Many moons later, the whole structure was coated liberally with a creamy coat of acrylic filler mixed with PVA and some fine sand. This textured the whole thing nicely, and it lost its "plastic toy fort" look.


I decided to give the structure an illusion of greater height by bringing the stonework down over the foam board base, and fairing it in with putty.

Sand and grit glued down over the path and base edges.
Painting! Stonework sprayed with Panzer Grey Tamiya enamel, and then a coat of matching acrylic using a brush to make sure all the nooks and crannies have been coated.

Leave to dry out for a few weeks.
In the meantime I decided to work on the gate. The one provided with the kit is a pathetic, thin little thing with unconvincing hinges, one which wouldn't keep out even a moderately aggressive real estate salesman. It didn't even fit its doorway.
So using it as a blank I got out some plastic card and strip stock, and beefed it up with new planking and beams on both the inside and outside face. Small flat washers for the ornamental knockers. Gotta love knockers.
Front...

And back. The fit into the wall still isn't what it could be, but a big improvement on the original, I think.


I decided to paint the door a weathered green.


The rest of the model was being painted in a series of consecutive coats of washes and wet-and-dry brushing. I worked up through successively lighter tones ranging from battleship grey to sandstone, culminating in a light drybrushing of ivory for the highlights and edges. The whole thing was then given a couple of filter coats using very-well thinned raw umber to tone it all down and to give it a soft, aged look.
All this took some time, and I found that the shading had to be fairly high-contrast for it to stand out at a distance.
All this took some time, and I found that the shading had to be fairly high-contrast for it to stand out at a distance.

While I was doing all this I began work on the roof. I had found a suitably-shaped block of wood at the local craft store, and glued it on top of a slightly smaller, square piece of wood that would drop into the tower top. I then had loads 'o fun adding the roofing tiles! I had ordered these from Antenociti's Workshop (a treasure house of modelling goodies for gamers).
 Produced by Builders in Scale, (website here), they came in sheets of tile strips with adhesive backing, and once applied could be trimmed to shape. They took some practice at first, as you have to be careful how one row of tiles lines up with the one immediately below. But once I worked this out, I soon found that they became very straightforward to apply.
I coated the whole structure with watered-down PVA for strength, and the tiles took paint well.
Here it is after painting. It's detachable for ease of transportation, and if I want to give it an earlier look- say for games with Giovanni's Norman army in Sicily- I can leave it off. You can see I added some planking to the walkways, along with a ladder.


The last touch was adding static grass to the base, and painting in the windows and doors. There are still a few more internal details I would like to add as time goes on, so as to give it more of a "lived in" look, but here it is all ready for the gaming table.


Reference shot, including curious tabbycat for scale purposes. The base measures about 30cm x 30cm square, and the whole structure stands about 25-32cm tall, depending on whether the roof is attached or not. Height of feline currently undetermined.
I'm very pleased with it, and it should pass muster for a wide variety of games. We have no problem using 20mm terrain with 28mm miniatures. The buildings take up less space on the battlefield, and the footprint taken up by a unit of 36 28mm miniatures is out of scale to their height anyway.
Now all I need to do is think of someway of transporting it to club games, along with all my other terrain and miniatures...


